How to Fix HDMI Port Not Working on Windows 11

Are you experiencing issues with your HDMI port not working on Windows 11? Having trouble with your HDMI port on Windows 11? No worries! We’ll cover easy steps to help you troubleshoot and fix common HDMI port problems on your Windows 11 PC.
Fix HDMI Port Not Working on Windows 11
Check the Connections:
- Check HDMI cable is securely connected to both your PC and the external display.
- Check external display is powered on and set to the correct input source.
Update Graphics Drivers:
- Press the Windows key + X, then select “Device Manager.”
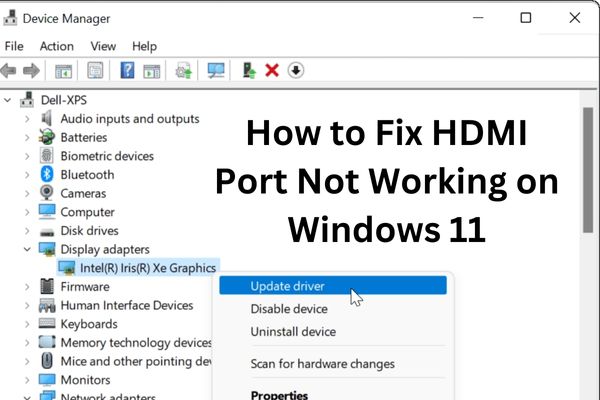
- Expand the “Display adapters” category, right-click your graphics card, and choose “Update driver.”
- Follow the on-screen instructions to install any available updates.
- Restart your PC after the driver update.
Adjust Display Settings:
- Right-click on the desktop and select “Display settings.”
- Scroll down and click on “Advanced display settings.”
- Choose the external display, then click on “Display adapter properties for Display X.”
- In the properties window, go to the “Monitor” tab and click on “Properties.”
- Ensure that the “Enable this device” option is selected.
- Click “OK” to save the settings.
Disable Power Saving Settings:
- Press the Windows key + X and select “Power Options.”
- Click on “Additional power settings.”
- Select the power plan you’re using and click on “Change plan settings.”
- Choose “Change advanced power settings.”
- Expand the “PCI Express” category and set “Link State Power Management” to “Off.”
- Click “Apply” and “OK” to save the changes.
Update Windows:
- Press the Windows key + I to open the Settings app.
- Click on “Windows Update” in the left-hand menu.
- Select “Check for updates” and install any available updates.
- Restart your PC after the update installation.
Try a Different HDMI Port and Cable:
- If your PC has multiple HDMI ports, try connecting to a different port to see if the issue persists.
- Use a different HDMI cable to rule out a faulty cable as the cause of the problem.
Test with Another Display Device:
- Connect your PC to a different external display or TV to check if the issue is specific to one display.
- If the problem only occurs with a particular display, it may indicate a compatibility issue.
Frequently Asked Questions (FAQs)
Q: Why is my HDMI port not working on Windows 11?
A: There can be many reasons why your HDMI port is not working: loose connections, outdated graphics drivers, incorrect display settings, power saving settings or compatibility issues.
Q: How do I check the connections for my HDMI port?
A: Check HDMI cable is securely connected to both your Windows 11 PC and the external display. Additionally, make sure thecheck external display is powered on and set to the correct input source.
Q: How can I update my graphics drivers on Windows 11?
A: You can update your graphics drivers by right-clicking on the “Start” button and selecting “Device Manager,” expanding the “Display adapters” category, right-clicking your graphics card, and choosing “Update driver.” Follow steps to install any available updates and restart your PC afterward.
Q: What display settings should I adjust to fix HDMI port issues?
A: Right-click on your desktop, select “Display settings,” scroll down and click on “Advanced display settings.” Choose the external display, click on “Display adapter properties for Display X,” go to the “Monitor” tab, and check “Enable this device” option is selected. Click “OK” to save the settings.
Q: How can I disable power saving settings for the HDMI port?
A: Open the “Power Options” menu by right-clicking on the “Start” button and selecting it. Click on “Additional power settings,” choose your current power plan, click on “Change plan settings,” select “Change advanced power settings,” expand the “PCI Express” category, set “Link State Power Management” to “Off,” and save the changes.
Q: How do I update Windows on my Windows 11 PC?
A: Press Windows key + I to open the Settings app, click on “Windows Update”, select “Check for updates,” and install any available updates. Restart your PC after the update installation.
Q: What should I do if trying a different HDMI port and cable doesn’t solve the issue?
A: If the problem persists, test your Windows 11 PC with a different external display or TV. If the issue occurs only with a specific display, it might indicate a compatibility problem.
Q: Are these troubleshooting steps applicable only to Windows 11?
A: Yes, these steps are specifically designed for fixing HDMI port issues on Windows 11 PCs.
Conclusion:
By these steps you can fix HDMI port issues on your Windows 11 PC. Remember to check the connections, update graphics drivers, adjust display settings, disable power saving settings, update Windows, try different ports/cables, and test with another display device if needed. Enjoy a seamless multimedia experience with your Windows 11 PC!


